Being a great lash artist isn’t just about flawless application—it’s about designing with intention. While perfect placement is essential, the true artistry lies in how you shape and map each set to enhance your client’s unique eyes. That’s where lash mapping comes in.
Lash mapping is a creative process where you plan the lengths, curls, and thicknesses across the lash line to achieve a custom result. Whether your client wants a soft and natural look or a bold and dramatic one, lash mapping helps you deliver a look that’s both beautiful and balanced.
In this guide, you’ll learn how to assess your client and apply the most flattering lash mapping styles—plus a checklist to ensure you’re setting yourself up for success.
Popular Lash Mapping Styles
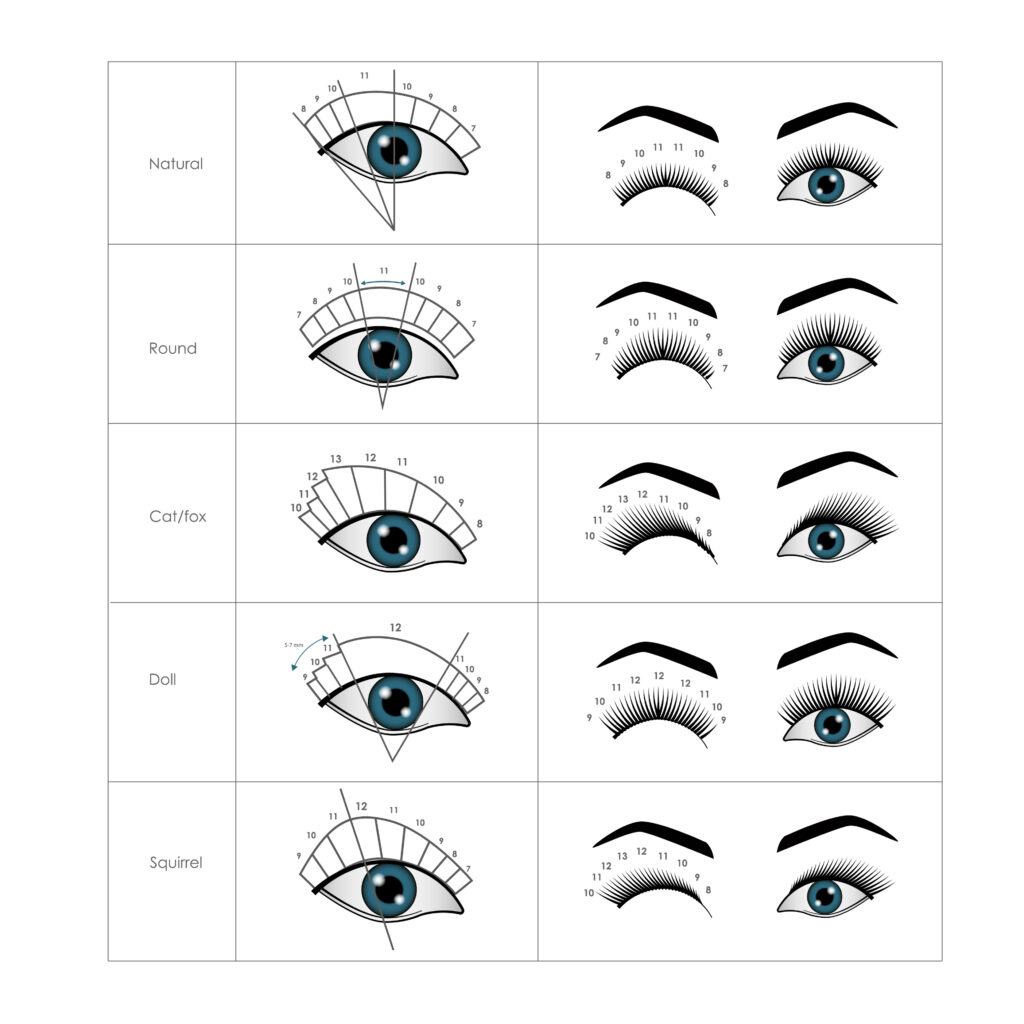
Every eye is different—and lash mapping lets you customize each set accordingly. Here are 5 must-know styles every lash artist should master:
1. Natural Eye
- Look: Soft, subtle, and balanced
- Design: Gradual increase from inner to center, tapering at the outer edge
- Best for: Everyday wear or first-time clients
- Ideal for: Almond, round, upturned eyes
- Avoid for: Hooded, monolid, or downturned eyes
- Pro Tip: Use C or CC curls for a universally flattering lift
2. Cat Eye
- Look: Elongated and lifted with a dramatic, winged finish
- Design: Short-to-long lash length moving outward
- Best for: Glam looks, confident styles
- Ideal for: Almond, round, monolid, close-set eyes
- Avoid for: Wide-set or heavily downturned eyes
- Pro Tip: Use D curls on outer corners for extra flick
3. Squirrel Eye
- Look: Tapered, elegant lift between Natural and Cat Eye
- Design: Longest lashes just before the outer corner
- Best for: Soft glam and wearable volume
- Ideal for: Almond, round, slightly downturned eyes
- Avoid for: Very wide-set or extremely round eyes
- Pro Tip: Mix C and D curls for lifted symmetry
4. Kitten Eye
- Look: A soft and wearable Cat Eye alternative
- Design: Mid-lengths extending toward outer third
- Best for: Everyday glam
- Ideal for: Almond and round eyes
- Avoid for: Naturally lifted or wide-set eyes
- Pro Tip: Use CC curls to keep lift gentle
5. Open Eye (Doll Eye)
- Look: Bright, lifted, and round
- Design: Longest lengths directly over the iris
- Best for: Clients wanting bigger, more awake-looking eyes
- Ideal for: Hooded, monolid, downturned, or small eyes
- Avoid for: Naturally round or prominent eyes
- Pro Tip: Use C curls across the lash line for balanced openness
CHECKLIST: BEFORE YOU START LASH MAPPING
“Your client may come in with a specific style in mind, but before you begin, it’s important to evaluate whether that look truly complements their features. Take a moment to have them sit upright and look straight ahead so you can properly assess their eye shape and facial structure. Performing this assessment while they’re lying down can distort their natural proportions and lead to an inaccurate evaluation.”
1. Eye Shape
Understanding your client’s eye shape is essential for creating flattering lash sets. Below are the four main eye shapes and tips for selecting the right lash mapping style for each.
Almond Eyes
Almond-shaped eyes are one of the most common and versatile shapes. If the top and bottom lids slightly cover the iris, the eyes are likely almond-shaped.
Lash Mapping Tips:
- Almond eyes are suitable for most lash maps.
- Select the style based on the client’s desired effect (e.g., wider, brighter look vs. elongated shape).
- Always consider other factors such as eye angle, face shape, and lash growth direction.
Recommended: Any mapping style can work—Natural, Cat Eye, Doll Eye, or Squirrel Eye—depending on the desired outcome.
Note: Adjust curl and length according to the eye angle and overall symmetry.
Round Eyes
Round eyes have a visible, fully open iris that isn’t covered by the lids. This shape often appears bright and expressive.
Lash Mapping Tips:
- Concentrate length toward the outer corners to create a more elongated, almond-like appearance.
- Choose softer curls such as B or C curls for balance.
Recommended: Natural or Cat Eye mapping works well for elongating round eyes.
Avoid: Doll Eye or Open Eye mapping as well as very strong curls (like D curls), which can create a surprised look.
Hooded Eyes
Hooded eyes feature a heavier brow bone and a less visible crease, often causing the lash line to be partially hidden.
Lash Mapping Tips:
- Use a curl that extends past the fold of the lid for visible lift.
- Specialized curls like L or L+ work especially well.
Recommended: Select curls that open the eye without curling back into the lid.
Avoid: Strong curls like CC or D curls that can make the lashes bend back toward the lid and appear unnatural.
Monolid Eyes
Monolid eyes lack a defined crease, creating a smooth lid surface. This shape is common among many clients of Asian descent.
Lash Mapping Tips:
- Lengthen the inner corner slightly for balance.
- Choose styles that lift and open the eyes.
Recommended: Doll Eye or Cat Eye mapping with slightly longer inner corner lengths.
Avoid: Natural mapping styles, which can make the eye appear smaller or less lifted.
By tailoring your lash mapping approach to each eye shape, you’ll create designs that enhance your client’s natural features and deliver results they’ll love.
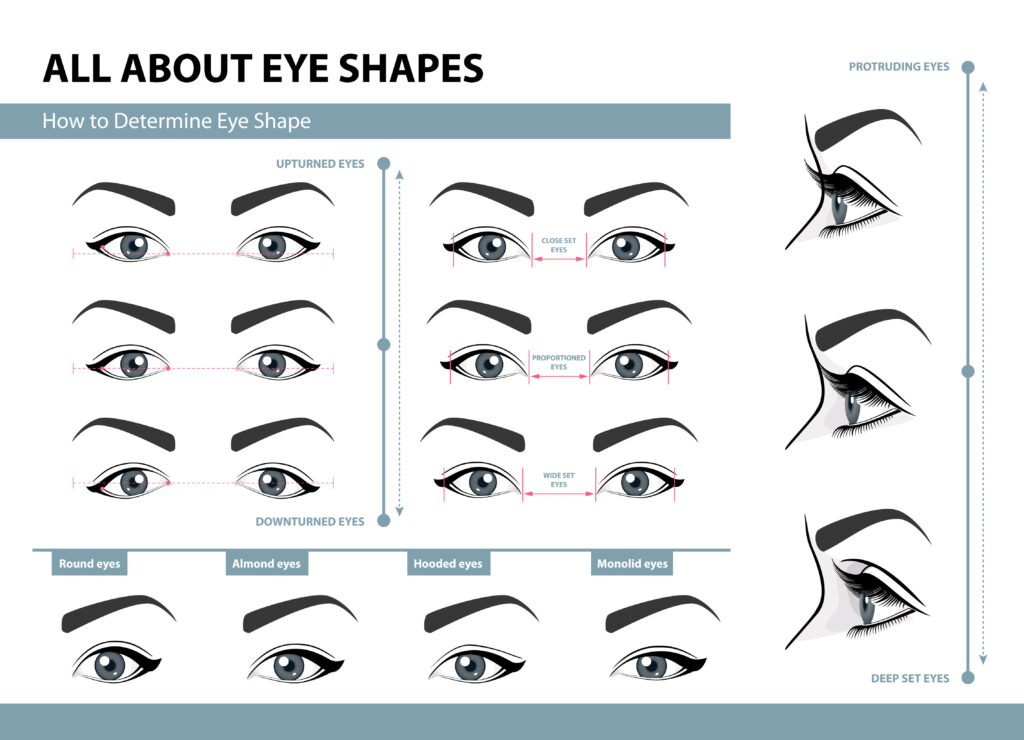
2. Eye Angle
Understanding eye angle, eye spacing, and face shape is essential for creating lash designs that flatter your client’s features.Your client’s eyes may be straight, slightly upturned, or slightly downturned.
Upturned Eyes
Recommended:
The outer corners sit higher than the inner corners, giving a naturally lifted, “cat-eye” appearance.
- Cat Eye mapping to emphasize the natural lift
- Natural mapping for a softer balance
Avoid:
- Doll Eye or Open Eye mapping, which can create an overly round look
- Strong curls (like D curls) that may make the eyes appear startled
Downturned Eyes
The outer corners dip lower than the inner corners, creating a more relaxed look.
Recommended:
- Doll Eye or Open Eye mapping, focusing length toward the center to lift the eyes
- Use strong curls at the outer corners to counter the downturn
Avoid:
- Cat Eye mapping, which can accentuate the downward tilt and make the eyes appear tired
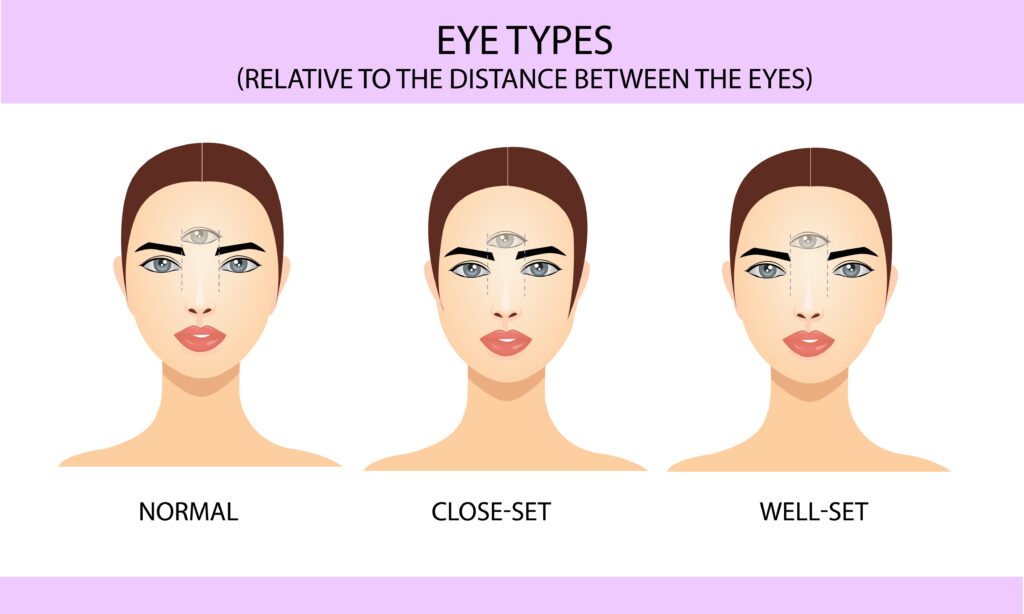
3. Eye Spacing
Close-Set Eyes
Eye spacing affects how balanced and symmetrical a lash set will look.
The space between the eyes is less than one eye’s width.
Recommended:
- Longer lengths at the outer corners to visually widen the space
Avoid:
- Doll Eye or Open Eye mapping, which emphasizes the center and can make the eyes look closer together
Wide-Set Eyes
The space between the eyes is greater than one eye’s width.
Recommended:
- Doll Eye or Open Eye mapping to pull attention toward the center
Avoid:
- Elongated Cat Eye mapping, which can make the eyes appear even farther apart
4. Face Shape
Your client’s face shape also plays a role in selecting the most flattering lash style.
Wide Faces
Recommended:
- Cat Eye or Natural mapping for balance
Avoid:
- Doll Eye or Open Eye mapping, which can create too much roundness
Narrow Faces
Recommended:
- Doll Eye, Open Eye, or Natural mapping for a harmonious look
Avoid:
- Long, winged Cat Eye mapping, which may elongate the face further
By assessing eye angle, spacing, and face shape together, you can select lash mapping styles that highlight your client’s best features and ensure beautifully balanced results.

Natural Lash Direction, Curl, and Strength
Understanding the natural lash direction and strength of your client’s lashes is critical for creating a comfortable, long-lasting, and flattering set.
Natural Lash Direction & Curl
The way natural lashes grow can vary greatly between clients. This factor influences which curl type will create the best result.
Upward-Growing Lashes
- Recommended Curls: J, B, C
- Avoid: D, U, M, L, L+
Straight Lashes
- Recommended Curls: Any curl type works well
Downward-Growing Lashes
- Recommended Curls: C, D, U, M
- Avoid: J, B, L, L+
Downward-Growing Lashes with Monolid Eyes
- Recommended Curls: L, L+
- Avoid: J, B, C, D
Natural Lash Strength
The strength and thickness of the natural lash determine how much weight and length it can safely support.
- If your client’s lashes are fine or delicate, avoid heavy or long extensions.
- Only add extensions that are equal to or up to 3mm longer than the natural lash.
- Extensions should never exceed 50% longer than the client’s natural lash length.
- To check: Lay the client back and hold the extension against their natural lash to measure before selecting the length.
Naked Lash Tip: Educate your clients that longer isn’t always better. A lash set tailored to their lash health will look better and last longer.
Consultation Is Key
Before starting lash mapping, talk with your client about their desired look. Use your assessment of lash direction and strength to guide them toward the most flattering and safe style. Explain any adjustments you recommend and why.
By combining your client’s preferences with your professional assessment, you’ll create a lash design that is both beautiful and healthy.